Free Printable Gift Wrapping Papers & Tags – Smiles & Confetti

Free Printable Gift Wrapping Papers & Tags - Smiles & Confetti

When it comes to wrapping presents for the holidays I prefer to go the non-traditional route. Not only am I never really into the whole red and green combo thing, but it makes the most sense to me mostly because of all of the birthdays I celebrate before and after Christmas. I usually wrap all the gifts I send out in different wrappings and trims, but this year I wanted all my pressies to be sent out in matching style. That’s why I designed 3 different gift wraps,  and 4 different gift tags to share with you! 

To download the smiley face gift wrap CLICK HERE!
To download the confetti gift wrap CLICK HERE!
To download the fun illustrations gift wrap CLICK HERE!

These papers are sized at 8.5″ x 11″ so they can easily be printed from your own home. When printing papers at home, remember to set your print quality to high and make sure to select that the printer manages the colors.

These designs are the perfect size for small presents! However, if you want to use them for bigger packages you can also take the file to your local print shop and have them enlarged. Another option is to use scissors and a glue stick to attach them together at the pattern overlap.

To download the git tags, CLICK HERE! 

The gift tags can be made in a variety of sizes by adjusting the print dimensions in the printer preview window. You can print them on regular paper, but a thick cardstock gives them a nicer feel.

What I especially love about these gift wrap designs I created, is that they can be used all year long! Of course, they are perfect for holidays and birthdays, but there is so much more than you can do with them. Use them as scrapbook paper, for wrapping up a hostess gift, or turn them into cards or stationery!

Check out:

DIY: Festive Flamingo & Disco Ball Decor

DIY: Festive Flamingo & Disco Ball Decor

Back when I was still blogging with bloggers, I collaborated with Best Friend’s For Frosting and made some really fun projects for their site. Now that I have my new blog up and running, I wanted to share the tutorials for those projects here. So, if you want to learn how to make a flamingo pinata,  some awesome disco ball cake toppers, and a disco ball cake stand, keep on reading below!

You can never go wrong decorating with flamingos and disco balls. In my opinion, these are two symbols that will never go out of style. Anytime you can incorporate them both into one theme, I say do it!

This flamingo piñata is not just for parties. The added embellishments make it perfectly chic to hang in your home as decor. I mean, who would not want a flamingo piñata to dress up their living space?

FLAMINGO PINATA MATERIALS:
– Cardboard
– Crepe Paper Streamers
– Hot Glue and Extra Strength Glue Stick
– Pencil
– Scissors
– String
– Extra Embellishments (optional)

1. Draw and cut out your cardboard pieces. You will need 6 pieces total – two flamingo shapes, two wings, and two long strips for the sides.  The side strips should equal the perimeter of your flamingo in length, and be as wide as you would like.

2. Bend each cardboard strip a bit to give it some curve and flexibility. Starting at the tip of the tale, use dots of hot glue to attach the strips to the edge of your first flamingo piece. Once one side of the piñata is secure, poke a hole on the top of your piñata, and add the string for hanging. Then, seal it up by hot gluing the other flamingo piece down to the strip’s edge.

3. Now it is time to decorate! Create fringe from your crepe paper streamers, and start to add it in rows from the bottom to the top. I applied the fringe using a glue stick and trimmed away the excess crepe paper to expose the flamingo shape. Once the front and back are finished, you continue adding fringe to the sides in the same manner. To achieve a smooth finish to the neck and head, cut small strips of crepe paper, cover the entire back of the strip with glue, and then smooth it around the piñata like you would with paper mache. Adding more glue can help smooth out any bumps. Keep layering the strips of crepe paper until you like the opacity.

4. Add fringe to your wing pieces the same way you did with the body, and then hot glue one wing to each side. If you like, you can add googly eyes, feathers, sequins, ribbons, and much more!

Now let’s get glam with some mini disco balls! These sparkly cake stands and matching cake toppers are a great way to dress up a simple cake or liven up a dessert table. Plus, they are incredibly easy to make!

DISCO BALL CAKE DECORATION MATERIALS:
– Glass Plate
– Small Round Vase
– Mini Disco Balls
– Silver Foil Tissue Paper
– Scissors
– E600 Glue
– Skewers or Lollipop Sticks

  1. Create confetti by chopping up your foil tissue paper into small pieces. Fill your vase with some of the confetti to create a bed for the disco balls to sit on. 
  2. Remove the strings from your disco balls and then place them into your vase. Position them to your liking, then lightly glue the inside edges where each disco ball touches one another. 
  3. Glue the glass plate to the top of the vase, and allow it to dry for 24 hours. 
  4. To create the disco ball cake toppers, remove the strings from each disco ball, and replace it with a wooden skewer or plastic lollipop stick. Make sure to press it firmly into the Styrofoam core of the disco ball

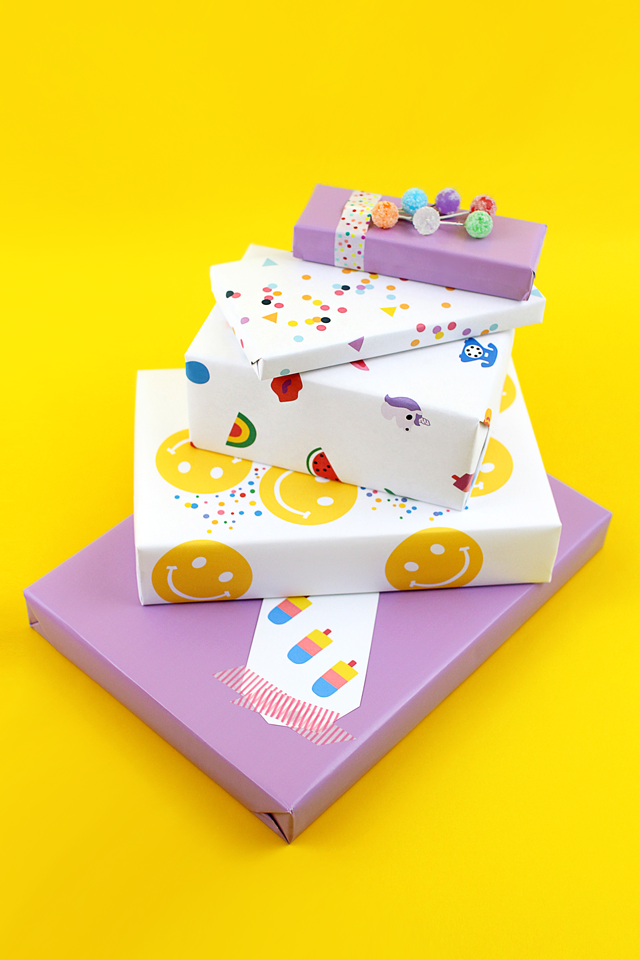
Check out: Free Printable Gift Wrapping Papers & Tags – Smiles & Confetti

Star Crown DIY Tutorial

Star Crown DIY Tutorial

I have had the idea for this dreamy star crown on my mind for quite a while now. I haven’t really had any parties or occasions to wear one too, and I think it would make the most sense to post the tutorial for it around New Year, but I just HAD to make it. Plus, Halloween is coming up, and that gives me an excuse!  So, if you want to be a princess, beauty queen, or a vintage circus performer for Halloween (because let’s face it, who wouldn’t?) or if you are like me, and just feel more confident when wearing a giant, sparkly crown while you work, then this is the tutorial for you. Let me show you how to make your own:

Sticky-back glitter foam
Headband
Wire
Rick rack or ribbon (optional)
Star template
Pencil
Scissors
Pliers

Print and cut out your star template. Trace your stars onto the back of the sticky glitter foam, and then cut them out. You will want an even number of stars, and the amount will vary depending on how many stars you want in your design.

Cut pieces of wire to the desired height of your crown. Try varying lengths for an extra dramatic look. Use the pliers to help wrap the ends of your wire to your headband, making sure you firmly press down the ends.

Straighten out the wire as much as possible, and star adding stars. The white paper back of the glitter foam should easily peel off. The goal is to sandwich the wire between two stars, with the sticky sides of the stars together. Press the middle and tips of each star firmly.

Add as many stars as you like. You can layer them, cut them up, and even try using a variety of colors. You can also glue rick rack or ribbon to the headband base if you like.

These crowns are extremely easy and inexpensive to make! So much so, I’m seriously considering creating about 10 more. And it just occurred to me how perfect these would be for party favors, and as props in a photo booth… What do you think?